Project 4a – Interaction Designs

In this step, I will be providing a short introduction on how I plan to create a user experience for the flowcharts created from the last part of the project. The main concept is to design a user interaction experience with the flowchart hierarchy, allowing the users to navigate the levels of abstraction.

I will be writing the program using Unity, taking advantage in its flexibility in both 3D and 2D interactive designs and its ability to create cross platform applications, but ultimately the final product will be designed for portable smart devices such as tablets and smart phones.

Application Structure

The above image is the general structure of the application. The user will start from the first layer of abstraction where the level of detail is the lowest and travel between each layer using simple the pinch motion that we are all familiar with. The nodes of the first layer will be in the form of animated GIFs, or recorded dialogs with simple information about the process. Users may tap on the nodes the activate them. This layer will provide very little detail on the creation process of the necklace and will only serve to provide a highlight to the overall process.

The second layer will provide the users with more detailed information. The nodes will be in for form of videos or lengthly recorded dialog information about each topic which, again, can be activated by tapping. This layer will provide the most information on each nodes and how they are related to each other.

Layer 3 Interaction Designs

Finally, the above image is a sample interface of the third layer. This layer provides an opportunity for users to put what they’ve learned about the process to use. User will be given the “action” nodes on the side and must connect them via dragging to fill up the blank nodes. Simple description or images will appear as each action is selected to serve as hints for the users. Once the entire layer is completed, a video that explains the entire creation process will be played.

Project 4a – Editing Flowcharts

The first part of project 4 is to edit the information I found while researching for the process of creating the gold necklace for easier and clearer understanding, and to plan for implementing user interaction with the flowchart hierarchy. In this step, I will be modifying the flowcharts to represent information targeted for the DMA visitors.

First of all, let’s focus again on the Question Art Diagram created by the ArtNC website. Link Here.

FX_SAAPW_6@Y$@J]%DV8Q[F

The Question Art Diagram noted some of the questions one may have when thinking about the Inca Gold Necklace. These questions will serve as a guideline to the direction of my research on the artifact. As we learn more of this artifact, we can provide more answers to this diagram and ultimately construct the creation process of the necklace. These raw knowledges will most likely be in the form of natural language such as English, but I will organize them into process models with layers of increasing complexities and represent them using flowchart diagrams.

The research materials were already presented in project three so I will not be going over them again. But before I create the process flowcharts, I must show the relationship of all the pieces related to the creation of the artifact. I will do this using a concept map, which was modified from the concept map in project three.

Concept Map

A concept map is a conceptual diagram that depicts suggested relationships between concepts. As we can see that the arrows indicate the relationships between each connecting nodes. I will use this map to identify connections and study the processes between each node to form the flowcharts.

As I did in project three, I will have total of three levels of abstractions, each represented by a flowchart model. The first layer will be a state transition model consisted of three nodes – gold processing, spinning, and threading the beads of the necklace. This layer is the first and most abstract layer. It contains the leasts amount of details and is designed to provide an overview of the process and give us a general idea of how the gold necklace was created in one glance.

Layer 1

In the next layer, we narrow down the abstraction level and introduce additional nodes. I will be representing this layer using a functional model, focusing on the objects going into each process and its outputs. The relationship of each process becomes more apparent here as well.

Layer 2

Finally, in the most bottom layer, I will be displaying all the nodes and objects of interests. Notice the level of details and how it clearly depicts the entire process. I am using only text to deliver information instead of with images because at this level, the additional information that an image can transfer is not as significant anymore. This is the highest level of detail the study will go as I am not interested in how gold was deposited on the mountains nor the tools of each work processes were made. Going into further details may obscure what I am interesting the most – the gold necklace itself.

Layer 3

Finally, if we are to implement the process using computer languages, we need to approach this logically. Below is a flow chart designed to handle the computer algorithms.

Layer 3 Modified

As we can see, the most prominent difference about this diagram is that it has a lot more decision nodes to regulate the process flows. Computers do not think like humans do. We the humans understand things through what some scientists are called referencing, meaning when we see something, we try to link it to something that we understand and try to make sense of it. Computers are more logical. The diagram may not convey much what some might call it the emotion of understanding something, but the path are clearly define and decisions are clear cut. Such traits are needed to ensure that a computerized process runs effectively and precisely.

Concept Map and Flowcharts

The goal of this project is to create a multi-layer flowcharts to represent layers of complexity in the creation of the Inca golden necklace. Below is a very simple hierarchical structure that I came up with while brainstorming, the structure breaks down the process of what we know as the “creation of the gold necklace”. Each layer represents a different level of abstraction, the top being the most general, and down the layers to show more detail. This will serve as my template to form the concept map and flowcharts for this project.

Necklace Hierarchy

Let’s first create a concept base on this hierarchical structure.

Necklace Concept Map

A concept map is a conceptual diagram that depicts suggested relationships between concepts. We can see here that the relationships of each nodes are clearly defined by text. I will use this map to identify connections and study the processes between each nodes to form our flowcharts.

The first layer flowchart will be a state transition model consisted of three nodes – Gold Processing, Threads Processing, and Threading Beads. This layer is the most abstract and least detailed layer. It provides an overview of the process and gives us a general idea of how the gold necklace was created in one glance.

First Layer

In the next layer, we narrow down the abstraction level and introduce additional nodes. I will be representing this layer using a functional model, focusing on the objects going into each process and its outputs. The relationship of each process becomes more apparent here as well.

Second Layer

Finally, in the most bottom layer, I will be displaying all the nodes and objects of interests. Notice the level of details and how it clearly depicts the entire process. I am using only text to deliver information instead of with images because at this level, the additional information that an image can transfer is not as significant anymore. This is the highest level of detail the study will go, and I am not interested in why the mountain contains gold nor how was the wool spun into threads. Going into further details by additional images may obscure what I am interesting the most – the gold necklace itself.

There are no right or wrong amount of information to provide, but this is where I drew the line; I want to show how the necklace was made, so I follow the materials that made-up the necklace itself and stopped there.

Necklace Level 3 Florchart

Finally, if we are to implement the process using computer languages, we need to approach this logically. Below is a flow chart designed to handle the computer algorithms.

Necklace Creation Flowchart Final Level

As we can see, the most prominent difference about this diagram is that it has a lot more decision nodes to regulate the process flows. Computers do not think like humans do. We the humans understand things through what some scientists are called referencing, meaning when we see something, we try to link it to something that we understand and try to make sense of it. Computers are more logical. The diagram may not convey much what some might call it the emotion of understanding something, but the path are clearly define and decisions are clear cut. Such traits are needed to ensure that a computerized process runs effectively and precisely.

Creation Processes

This section will be dedicated to answer the question – How was the necklace made?

Even though the Incas do not consider metal to be as precious as fine cloth, metalworks of the Incas were perhaps the most advanced in America at the time. Metal jewelries and various handicrafts were considered as an community’s obligation, or a form of tributes, in the Inca society.

The raw materials were usually supplied by the local depots, and a certain quantity of articles would be collected as tax and tributes from each household. While a large part of the everyday articles such as clothes, shoes, rope were made by the working class or peasants, the luxury goods such as fine cloth, jewelry, ceramics were the work of specialists.

Some of the artisans worked directly for the court and others worked at local workshops for provincial leaders, they all have different backgrounds and bear different social status as well. While most of them were considered as servants, their social status would range from war captives to privileged officials. As they worked and earned their place, their status would increase. Some may become body guards, obtain works in governing positions, or even become important figure in the society.

Gold Necklace Today

The two most common methods of gold mining today are Placer Mining and Hard Rock Mining.

Placer mining is the technique to extract gold in a placer deposit where gold has accumulated. Which means that the placer deposits are commonly associated with ancient river channels that brought loose gold to a certain location. Because golds are 19 times heavier than water, the most common extraction process such as sluicing and dredging involves both a strong water current to swept away the unwanted materials and allowing the heavier gold to sink to the bottom of the current.

Hard rock mining extracts gold encased in rock, rather than fragments in loose sediments like in placer deposits, and this kind of mining produces most of the world’s gold today. The mine can also be either open-pit or underground.

Once pure gold were obtained, gold can be made into jewelries by itself or with other gemstones or rare metals. Gold can also be plated onto other object as a coating. The most common method used today is electroplating. Hand engravings are also rarely seen today and has been replaced with more accurate methods like laser engraving.

How was the necklace made?

The Andes mountain region in today’s Peru were rich in minerals. Mining site predates the Incan empire has also been found throughout the Southern Nasca region in Peru. Most evidence today suggests that Inca mining was fairly extensive. Spanish also recorded that, in the 16th century, they contracted local workforces and forced laborers to mine for gold and silver in the mountains.

The below picture by the Spanish depicts a local legend of a mountain full of gold and silver.

debrypotosi1590

The Inca were a conquering society, and their expansionist assimilation of other cultures is evident in their artistic style, which utilized the vocabulary of many regions and cultures and incorporated them into a standardized imperial style that could be easily be replicated and spread throughout the empire.

The civilization of Chimu contributes a great amount of metal working culture to the Inca society when they were conquered by the Incas around 1470 AD. Copper, tin, gold, and silver were all obtained from mines or washed from the river gravels. This suggested that the Incas practiced both Placer mining and Hard rock mining like we do today.

The mined mineral would be handed over to the metallurgist, or metal specialists, and the more precious metal such as gold, silver, and magnesium would be used to make ornaments and decorations. The process of refining gold ores from hard rock mining started by heating the metal to very high temperatures and then cooled, resulting in small pallets of prills in a mass of slag (materials that are not useful for metallurgy). The prills are then extracted by crushing the slag, and then melted together to form ingots, which can be further fashioned into various items.

To create different shape, texture, and style of gold ornaments, the specialists would divide the metal treatment into plating, stamping, watermark, pearl, and embossing wooden molds. They use arsenic to harden the metals after they were cast, and smelting would take place in cluster of local workshops.

S40~~EGG_8$9G{BW6_1[P(7$HI3K`3`T@~0%9SO]J0}E$A

Let’s take a closer look at the craftsmanship of this necklace. We can see that the beads were joint by two semi-spherical gold pieces and there are indentations on the surface of the beads. For the face icon on the cylindrical beads, we can see signs of carving and engraving made by hands as the figures are clearly not identical.

From the right image we can see that the beads are hollow, suggesting that they were made into sheets of gold before folding and molding into spherical shapes, hence might explains the indentations on the surface. The beads were sprung together by threads, most likely made from animal wool. Incas also use plants to make threads, but usually in items that are less valuable and would need regular replacement. Since this artifact would belong to the upper class or have certain religious meaning, it is reasonable to think that threads were used to strung the beads together.

Some historians suggested that the choice of gold was to distinguish the more “sacred” or “holy” pieces from others, as the beautiful reflection that gold casts could be symbolized with the Incan religion surrounding the sun. Gold was reserved for the highest class of Incan society which consisted of priests, lords and the emperor – Sapa Inca himself.

Sources:
http://www.worldtrek.org/odyssey/teachers/peruexcerpts/artisanexcerpt.html
https://en.wikipedia.org/wiki/Gold_mining
http://latinamericanhistory.about.com/od/theconquestofperu/p/The-Treasure-Of-The-Inca.htm
http://www.esotericonline.net/profiles/blogs/the-rich-mountain-that-eats-men
https://en.wikipedia.org/wiki/Chimú_culture

Research on the necklace – What is it?

According to the DMA database, this piece of gold necklace was originated between 1476 and 1534 A.D., around the last half century of the Inca Empire. It belongs to the Nora and John Wise Collection and dimensions are 13 ½ x ¾ x ¾ inch, however the museum did not specify its weight.

3129006870938203_medium

Gold of Atahualpa

When the Spanish conquistador Francisco Pizarro captured the Inca Emperor Atahualpa in 1532, he agreed to release the Emperor in return for a roomful of gold, and twice that amount in silver. He received a portion of the golds, but when he reneged the deal and killed the Inca king, the remaining gold was buried by the Incans to a secret mountain cave, where the legend of Derrotero de Valverde has remained today.

A piece like this would be common in the Incan society as they were fond of using gold and silver as ornaments and for decorating their temples and palaces, as well as for personal jewelry. Many objects were made of solid gold (not in the case of this necklace though, more about this in the next article), and Atahualpa himself were said to have a throne made of pure gold and weighed 183 pounds. Golds may also be used as tributes from their vassals and sacrificial offerings, mostly in the form of jewelry and religious artifacts.

Patterns

This necklace would be common among the thousands of priceless items thought to make up the mythical lost Inca gold. It is made by a string of hollow gold beads connected by threads in a distinct pattern. Although patterns usually imply certain meanings, it is unclear whether this pattern serves any real purpose other than aesthetic reasons. One thing is clear though, we can see that the pattern of five consecutive small beads was intentionally kept throughout the creation of this necklace. There are five beads between every large beads and head figures, and twenty beads were used to bridge the beads across the back of the neck – multiples of five.

3128998480314853_medium

In fact, we can safely assume that this number doesn’t means anything more than aesthetic purposes because we can see that there are six large hollow beads and three large head figures on both side. If the number five had meant something in the creation of this necklace, the pattern should be seen in other artifacts found around the same region and era, which it was obviously not.

Head Figure

3171787690846503_medium inca-cup_24979_600x450440px-Cabeza_de_Viracocha,_Museo_de_América

On the necklace, a face of a man can be seen engraved onto the surface of the beads. It is uncertain who the figure was, if anyone at all, but it is obvious that this types of decorative facial figure is not uncommon among the Incans. The middle image shows an Inca gold cup engraved with a similar face.

The face was, however, not the standard facial figure for decoration because when observing other Inca idols, we can see that there are many other faces that the Incans would engrave. Could it be of a face of someone important? Or maybe it had some religious significance? The right image is the famous “Head of Viracocha”, the great creator deity in the Inca mythology, and one of the most important deities in the Inca pantheon known as the creator of all things. We can see that there are certain resemblance between the faces and without further studies into Inca records and artifacts, it is impossible to prove or disprove either cases.

Cultural Significance

U]82CCPJAMU2K97BHI}1GY8

It is interesting to see this piece of artifact because considering its Inca origin, it is very similar to necklaces found in other cultures, even the necklaces we see today.

Necklace is one of the most common form of jewelery, dating back to even before the bronze ages, it is often made with valuable and rare metal, stones, gemstones, glass, shells, corals, and beads. Necklaces are worn by men and women in cultures around the world for purposes and adornment and social status.

Study suggested that the wearing of jewelry was not uniform throughout the empire, as it was a common practice for the Incas to conquer a culture and assimilate them into its own, creating a mix of various traditions, religion, and social systems. However scholars believe that even though the Incas do not seem to have regarded metals to be as precious as fine cloth, people who wear them were usually the local leaders or someone of importance.

Sources:
MacQuarrie, Kim. The Last Days of the Incas. New York: Simon & Schuster, 2007. 123-137. Print.
http://ngm.nationalgeographic.com/2011/04/inca-empire/pringle-text
http://ngm.nationalgeographic.com/2011/04/inca-empire/clark-photography
https://en.wikipedia.org/wiki/Inca_society
https://en.wikipedia.org/wiki/Viracocha

Information Diagrams

Project 3: Creating Information Diagrams

For this project, I will be studying the processes of creating the Incan Gold Necklace and derive the process into several layers of abstraction. Each layer will be represented by a flowchart and increase its complexity as we progress deeper.

The goal is to take a peak into the Incan culture, create a system flow model, and try to find a way to bridge the arts and the technologies together.

Below is a concept map for this project, created by me using tools provided by the North Carolina Museum of Art. Link here.
FX_SAAPW_6@Y$@J]%DV8Q[F

The above image provides a rough outline for the project. Now I will break the project down into several main aspects and use these as the major fronts I will take to tackle the project. Each main focus are then broken down into areas of interests, or rather, questions I will try to answer.

1. Research on the artifact – What is it?

a. What was its social significance and meaning in the Incan society?
b. Materials used
c. Necklace in general – among other societies

2. Research on the process of creating the artifact – How was it made?

a. How would a necklace like this be made today?
b. How were the gold mined and refined?
c. How were the beads made and connected?

3. Layers of Flowchart Abstraction – Where am I going with it?

a. Layer structures
b. Workflow process
c. How to adapt the processing model into a computer system?

Sources:
http://artnc.org/conceptMap/1739

Posts, Pages, and new Projects

I noticed that Posts and Pages are considered as different entries in WordPress, and it is rather confusing to publish only using the page/subpage format and not the Post format because the new entries do not show up on the home page of the blog. So in the future, while I will still publish my blog entries as pages and subpages I will also publish them in the form of Posts, that way readers may easily see the new entries and still be able to refer to a project quickly using pages. With that being said, the Timeline project had been completed and published, you may view the papers on the top right section of my Blog.

For the next project, I will be doing researches on an Incan artifact, study its creation, and create several layers of abstraction for the creation process. Ultimately, this will be the base for my next project, which is the actual implementation of representing the processes of creating this artifact using programming languages.

Below is the image of the artifact – an Incan gold necklace from around 15~16th century.

3129006870938203_medium

Page and Subpage

Today I read up on the setup of page and subpage in WordPress and I managed to create some categories for the different projects I’ll be doing.

I am leaving the previous Quipu posts as they are for now. In the future I may decide to remove them when there are more posts and better organizations are needed.

Additionally, I have been doing some research on the next project, which is to use the DMA’s Brain API to create a timeline visualization of artifacts from the Pre-Columbian Department. I will soon post my finding on the workflow model, chronological events and media visualizations, and more specific information about its implementation on the Max 7.

Sources:
https://en.support.wordpress.com/pages/
https://en.support.wordpress.com/posts/categories/
https://www.dma.org/

Quipu Project – the Codes

5I)7L[6OP)I`VOFER3GWYOW

5ZJD0)N(R3Z$UJTXHWT(BUI

The first picture is how the application look and the second is its encapsulated codes.

From the first picture we can see that the main user interface is to the left. Users can input values of the cords, toggle the cords on and off, and there is a master switch which will be used to power on all the triggers and operators in the code.

Once the application was initialized and values are entered. The values are strip down to each digits in the patch “getValues”. This then triggers the drawing of the cords. Note the “send bang” object within the codes that process the ones values. The bang triggers the redraw of the main cord and the pendant cords, and the integer passed on by the trigger will then go on to be processed to find the corresponding location of the knots on the LCD object. This is done in the “getCoordinates” patches.

Once the coordinates are obtained, knots are drawn using paintrect and paintoval. The command then goes on to the SwitchControls to see if the cord is switched on for display. If it is, the cord and the knot are both drawn.

I should also note that I decided to keep most of the code on the interface instead of encapsulating them. The reason was that these codes are pretty clean as is, and putting everything in sub-patches leaving only the user interface on the front although is good application design, I feel that this would interfere with my ability to add other functions to the program later on and I would rather focus more on functionality design then to clean up UI’s.

But just in case someone is interested. Below is the clean up version of the codes.

JK4YN4{FA82}5X9C0GR%U]3

Quipu Project Description – Max 7 Implementations

In this project I will use Max 7 to model a simple yet functional Quipu.

The application will have the visual representation of a Quipu with 3 pendant cords on a main cord and allow operations like number insertion, cord deletion and modifying values. Also unlike the real Quipu, the size of the values allows on each cord is limited to three digits (0-999).

The visual will be done using LCD objects and inputs will be obtained from the number objects. The S knots will be represented as oval, and the E/L knots are represented as thin rectangles.

Overall this simple Quipu design will serve as a functional design which I may later implement additional functions such as addition.

[Application Design and Implementation]

According to the specifications above, I will need three number objects for user input, three toggles to allow users to add/delete each pendant cords, and a LCD object to display the simulated Quipu.

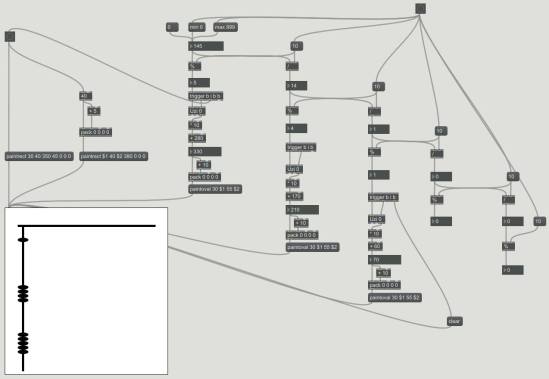
At the beginning I put my focus on a single cord. The first obstacle was to get the digit values from the input value. This was solved using simple math operators. The next problem was to draw the knots and the cords on the LCD object. I put the method to draw cords on a trigger, essentially every time the user changes the input value the the cords are redrawn. The knots are drawn with Uzi and triggers, the same triggers that passes the bang value to the cord drawing functions. The codes are as follows.

12005733_10153632382821514_1579980922_o

Next step I implemented the second and the third cords. The biggest problem was that every time the user changes a value of one cord, the entire LCD object was cleared, resulting in it only displaying one cord and not the others. I solve this by triggering a bang to draw the other cords every time a cord value was changed. I also start to experiment with switch outlets because I want to be able to turn the cords on and off. The codes are as follows.

11995300_10153632518921514_307030378_o

11996418_10153632550666514_1950536381_o

After all three cords were implemented. I implemented a series of switch outlets and buttons to allow users to control which cord would be on and off. Next I encapsulate the codes to make them easier to understand.

In the next blog entry, I will be going over the final codes in detail.